

How to Create an Evergreen Program in Practice Better
- Jan 19
- 3 min read
Updated: Jan 21
Evergreen programs are one of the most powerful ways to scale your practice on Practice Better. They allow you to create a self-guided (or partially guided) client experience that clients can purchase and begin at any time — without you needing to manually enroll them each time.
In this tutorial, we’ll walk step-by-step through how to set up an Evergreen Program in Practice Better, including how to structure your content, automate delivery, and generate your shareable link.
Important: You must be on the Practice Better Plus plan to access Evergreen Programs. If you don’t see this option, check your subscription level.
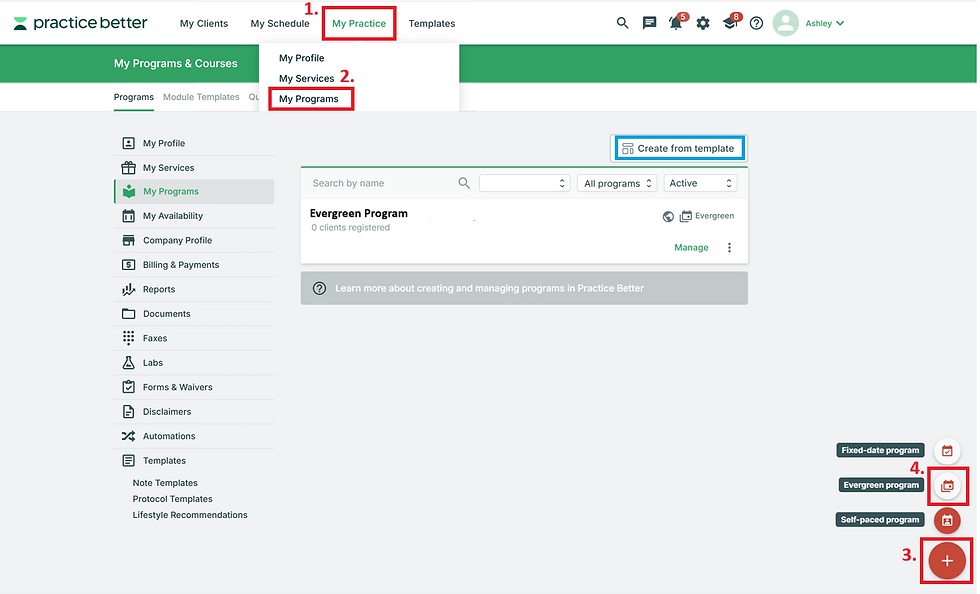
Step 1: Create a New Evergreen Program
From your dashboard:
Go to My Practice
Click My Programs
Click the + sign to create a new program
Select Evergreen from the list of program types (you can also opt to create from a Practice Better Template should you wish)

Step 2: Set Up Your Program Details
You’ll now be prompted to configure your program settings:
Fill in the following fields:
Title your program
Add a brief description (optional)
Set the program duration (for example: 6 weeks, 12 weeks, or ongoing)
Set your pricing
Check the box to require payment at booking
Choose whether to hide the fee in the client portal (optional)
Customize your button label and confirmation label
Set a confirmation page or URL redirect (optional)
Choose to send a welcome email when the client is registered
Click Edit Template if you want to customize the wording of this email
Once complete, click Next.

Step 3: Configure Advanced Options
Click into Advanced Options and set up any additional preferences:
Enable Group Chat (if this is a cohort-style or community-based program)
Check the box to Require Billing Information
Add Payment Plans (optional)
Attach any forms, such as:
Intake questionnaire
Health history form
Consent form
Click Next when you’re ready.
Step 4: Build Your Program Structure with Sections
Now you’ll start building your course content.
Click Add Section — these will act as your module groupings.
A common way to organize your evergreen program is by week, for example:
Section Title: Week One
Inside this section, you’ll add all modules that need to be completed in Week One.

Step 5: Create Your First Module
Once your section is created:
Click Create Module
Title your module (e.g., “Welcome & Orientation”)
Ensure this box is checked: Unlock module at a scheduled date
Set it to deliver 1 minute after the client enrolls
Check the box to Send an email when module starts
Click Edit Template if you’d like to customize the notification email

Step 6: Add Your Content
Click over to the Content tab — this is where you’ll add your teaching materials.
Here you can:
Type in your written content
Embed videos by clicking the little camera icon and pasting a video URL or embed code (YouTube or Vimeo)
Add forms & worksheets, quizzes, etc by clicking into the corresponding tabs (optional)
This is where your program really comes to life.

Step 7: Set Up Drip Delivery (Optional)
If you want to release content over time:
Create a new section (e.g., Week Two)
When setting up modules in this section, choose:
“Unlock 1 week after client enrolls”
Repeat this pattern for each section to drip your content over time. (e.g., Week Two, Week Three, etc.).

Step 8: Finalize and Share Your Program
Once your entire program is built:
Click Save
Copy your shareable link
This is the link you can:
Add to your website
Place in your email sequences
Share on social media
Embed in a sales page

Want to Edit or Share Later?
If at any time you want to:
Modify your program
Update pricing
Adjust content
Retrieve your shareable link
Check out our companion tutorial:👉 How to Modify or Share Programs on Practice Better
If you’d like hands-on support setting up a n Evergreen Program in Practice Better, we’d love to help. Click here to learn more about our Course Setup Package.


Comments