

How to Deliver a Dripped Program Email Sequence on Flodesk
- Jan 19
- 3 min read
Updated: Jan 21
Flodesk is a powerful email and automation platform — not just for sending newsletters, but for building structured, automated email sequences that guide your clients or students through a program over time.
With Flodesk Workflows, you can create a series of emails that are automatically delivered on a schedule after someone enrolls, purchases, or signs up. This lets you deliver your program content — like lesson emails, videos, worksheets, or other resources — in a dripped sequence that feels intentional and supportive.
In this guide, we’ll walk through exactly how to use Flodesk Workflows to deliver your dripped program email sequence so your program feels organized, automated, and impactful for every participant.
Create a Workflow
Step 1: From your Flodesk dashboard, navigate to the Workflows tab to create a new workflow, or click here to grab a free workflow template.
Step 2: Click 'Choose trigger' and ensure your Workflow is set to trigger once a subscriber is added to a segment.
Use the dropdown arrow to select your drip program segment (if already created), or begin typing to create a new segment for your drip program.

Step 3: Click into the first email, and ensure that your email settings are configured. You should review the following:
a) Sender Email
b) Subject Line
c) Preview Text
Step 4: Once those settings have been configured, you can edit the email itself. Simply hover over your email to Edit

Step 5: From within the editor, simply click into the image blocks, text blocks, buttons, etc to make any wording, style, or link updates.
You can click "+" to add in a Video Widget

And input the link of your YouTube or Vimeo video here

*** any changes you make here are auto-saved so you can simply click 'Back' or 'Finish' to return to the Workflow overview.
Step 6: Once you've completed your first dripped email, continue this process with your remaining emails. Your emails should be separated by a time delay, so that they are thoughtfully sent out to your audience after the webinar.
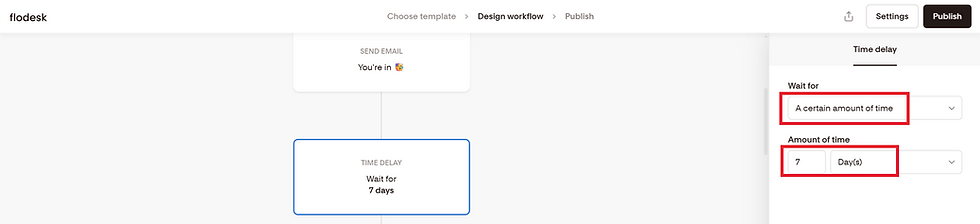
To do so, you can input an Action, and select "Time Delay"

---

When selecting the type of time delay, select "A certain amount of time", and set the desired amount of days between your dripped emails.
For example, if your content drips weekly, then your time delay should be set to 'A certain amount of time' and 7 days
Repeat this process (ie., Email, Time delay, Email, Time delay, etc) until you've input all of your program emails, then hit "Publish"
How to enroll subscribers into your dripped program
Once your Flodesk Workflow is built, the next step is getting your clients (or program participants) into it automatically.
There are a few different ways you can do this, depending on your setup:
Use a Zap (Zapier): Connect your checkout, form, or course platform to Flodesk so that when someone purchases or registers, they’re automatically added to your account and enrolled in the workflow.
Use a Flodesk Opt-In Form: You can direct buyers to this form after purchase (for example, by setting it as your checkout Success URL), which will add them to your list and trigger your drip sequence.
Sell via Flodesk Checkouts: This allows you to present your program, collect payment, and automatically add purchasers to the correct segment so your workflow starts in one seamless step — no extra tools required.
Whichever method you choose, it’s essential that you set up a dedicated segment in Flodesk that will trigger this workflow, so the right people are enrolled in the right sequence every time.
If you’d like hands-on support setting up a dripped program in Flodesk, we’d love to help. Click here to learn more about our Course Setup Package.


Comments