

How to Create an Evergreen Webinar Sequence on Flodesk
- Oct 16, 2025
- 5 min read
Hosting an Evergreen webinar is one of the most effective ways to connect with your audience, share your expertise, and consistently bring new leads into your business—without needing to show up live every time. With the right setup, your webinar can run on autopilot, nurturing potential clients and guiding them toward working with you, day after day.
In this post, I’ll walk you through how to set up a complete webinar sequence in Flodesk. You’ll learn how to:
Create an opt-in form that captures sign-ups in a simple, branded way.
Set up a dedicated segment to keep all webinar registrants in one place—making it easy to track where your leads are coming from and ensuring your automated workflow runs smoothly.
Build an automated workflow that delivers confirmation emails, the pre-recorded webinar, and follow-up sequences, before seamlessly moving subscribers into your main lead segment—keeping your system running smoothly while nurturing new leads year-round.
By the end, you’ll have everything you need to confidently manage your webinar sign-ups and communication, while focusing on what matters m ost: showing up live and delivering value.
Creating an Opt-In Form
Step 1: Click into "Forms"

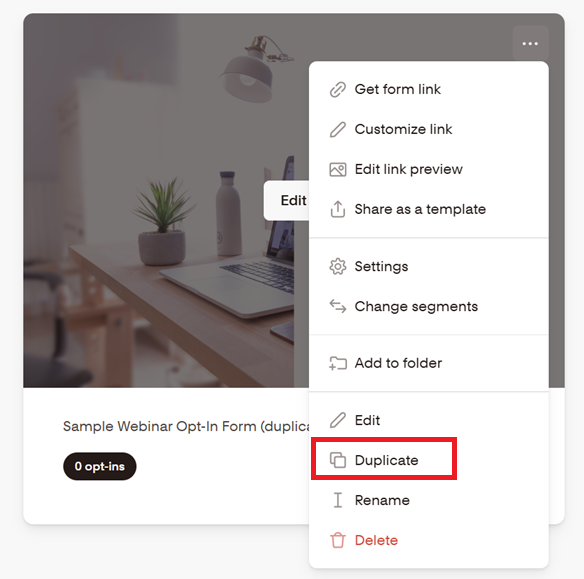
Step 2: Hover over your Opt-In Form Template and click the three dots, selecting "Duplicate" from the list
Step 3: Once you've made a duplicate, you can click into the title of the Opt-In Form to update it

Step 4: Hover over your Opt-In Form Template and click the three dots, selecting "Change Segments" from the list

Step 5: You'll see some settings pop up. Under the section "Choose Segments" you can use the dropdown arrow to select an existing segment, or you can simply start typing in the field to create a new segment.
**be sure to delete any old or sample segments that were connected to the template you duplicated

Step 6: In that same settings pop up window, you can click into "Link" and click the pencil icon to modify the link to your Opt-In Form
**this step is optional

Step 7: In that same settings pop up window, you can click into "Link Preview" and click into each of the corresponding areas to input:
a) a Social Share Image - this is what will pop up when the link to your opt-in form is shared via Instagram DMs, Whatsapp messages, Facebook Messenger messages, etc.
b) a Link Title - this is the bold title that will be shared
c) a Link Description - this is the preview text that will show up under the title of your link
**this step is optional but recommended

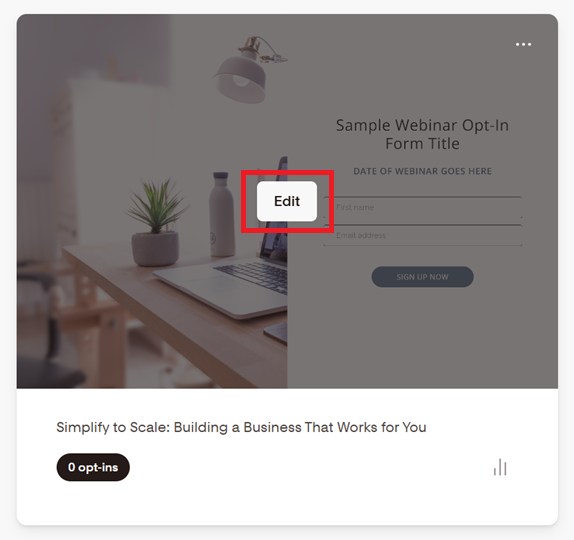
Step 8: Once those settings have been configured, you can edit the form itself to read the necessary information for your upcoming Webinar. From the Forms tab, hover over your new opt-in form to Edit
Step 9: From within the editor, simply click into the image, title, subtitle, input fields, and button to make any wording or style updates.
** you also have the option to click into the "Thank You" page to customize what will appear on screen once your user submits the opt-in form
*** any changes you make here are auto-saved so you can simply click the Flodesk logo to head back to the Forms tab.

Step 10: After you're totally finished with your Opt-In Form creation, you can click the 3 dots and "Get form link" to retreive the link that you'll use to drive traffic to this form / getting subscribers to sign up for the Webinar.

Creating an Automated Workflow
Step 1: Once you're totally finished with your opt-in form, you can now pop over to the Workflows tab

Step 2: Click the 3 dots on an existing Workflow Template, and click "Duplicate", or simply click "New Workflow" to start from scratch.

Step 3: Once you've made a duplicate, you can click into the title of the Workflow to update it. Then you can click "Edit" to start customizing the automated emails that your users will receive.

Step 4: From the Workflow Editor, click into the "Trigger" box, and set your Workflow to trigger once a subscriber is added to a segment. Use the dropdown arrow to select the segment you created and connected to your Opt-In Form.
**be sure to delete any old or sample segments that were connected to the template you duplicated

Step 5: Click into the first email, and ensure that your email settings are configured. You should be double-checking / updating the following:
a) Sender Email
b) Subject Line
c) Preview Text

Step 6: Once those settings have been configured, you can edit the confirmation / welcome email itself to read the necessary information for your pre-recorded Webinar. Simply hover over your email to Edit

Step 7: From within the editor, simply click into the image blocks, text blocks, and buttons to make any wording, style, or link updates.
If you have a sales pages that your webinar video lives on, then you can link that to a button within the email.
If you don't have a sales page for the webinar video, then you can link it directly within the email using a Video widget.
You can click "+" to add in a Video Widget - this is where your pre-recorded webinar video will live so that your subscribers can watch it after opting in.

And input the link of your YouTube or Vimeo video here

*you have the option to further segment your audience based on who actually clicks to view the video

** you also have the option to click into the mobile view to double-check how your email will appear to mobile users

*** any changes you make here are auto-saved so you can simply click 'Back' or 'Finish' to return to the Workflow overview.
Step 8: Once your Webinar Delivery Email is complete, you can continue building out a nurture sequence to follow. This should touch upon any questions your audience might have, dismantle any objections they might have, and always encourage them to move towards your main call to action.
Your emails should be separated by a time delay, so that they are thoughtfully sent out to your audience after the webinar.
To do so, you can input an Action, and select "Time Delay"

---

When selecting the type of time delay, select "A certain amount of time", and set the desired amount of days between your nurture emails.

Step 9: Once all of your emails have been set up within your sequence, all you have left to do is set a trigger to move your subscribers into your main lead sequence so that you can continue to market to them (IF they aren't converted during your webinar or following nurture sequence)
Your final action in the workflow should be "Add subscribers to segment(s) ". Select your main lead segment from the dropdown.
Once you're finished, you can Publish the workflow.

..


Comments